
2026-2 first practice
Console, LMS and Azure:
Your First Practice
A short, screenshot-led path from your first login to two practice responses shown to your tutor. Use your own assigned accounts. If an assignment is pending, ask your tutor before continuing.
Start here
Three places, one first-practice check.
Open the Academic Console first, then use the LMS and Azure links below. The practice uses two short responses so your tutor can confirm that your accounts and learning path are working. This is a first-practice verification and is separate from Lab 1 grading.
01
Academic Console
Start with the Telegram account you used for your application. The Console connects your timetable, orientation, account help, and practice status.
-
Step 01
Sign in with Telegram
Do this
- Open Academic Console and select CONTINUE IN TELEGRAM.
- Open the bot in Telegram and follow its sign-in instructions. Return to the Console in the same browser.
- If Telegram does not open, use TELEGRAM NOT OPENING? OPEN IN THE TELEGRAM APP.
You should see
The Console opens your account. Select Home to reach your student dashboard.
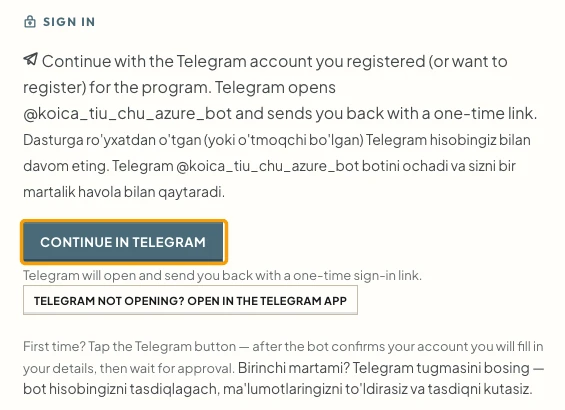
The actual Console sign-in screen. No Telegram code or private sign-in link is shown. Open full-size image -
Step 02
Use Home for tonight's steps
Do this
- For your first visit, select CHECK-IN QR. Show your personal code with your original photo ID to the tutor at the door.
- Select CHOOSE ELECTIVE to record your current choice in the authenticated Console. There is no public choice-lock time. Return to Home to check your published timetable.
- Select ORIENTATION & DIAGNOSTIC and answer the six baseline questions when it is available. This diagnostic does not affect your grade.
- During the onboarding practicum, use WEEKLY MOCK EXAM for the 12-question week 1 mock. Its window closes Sunday at 23:59, Tashkent time.
You should see
You know your AI-901 section, elective, and rooms. Your own account shows the available orientation and mock tasks.
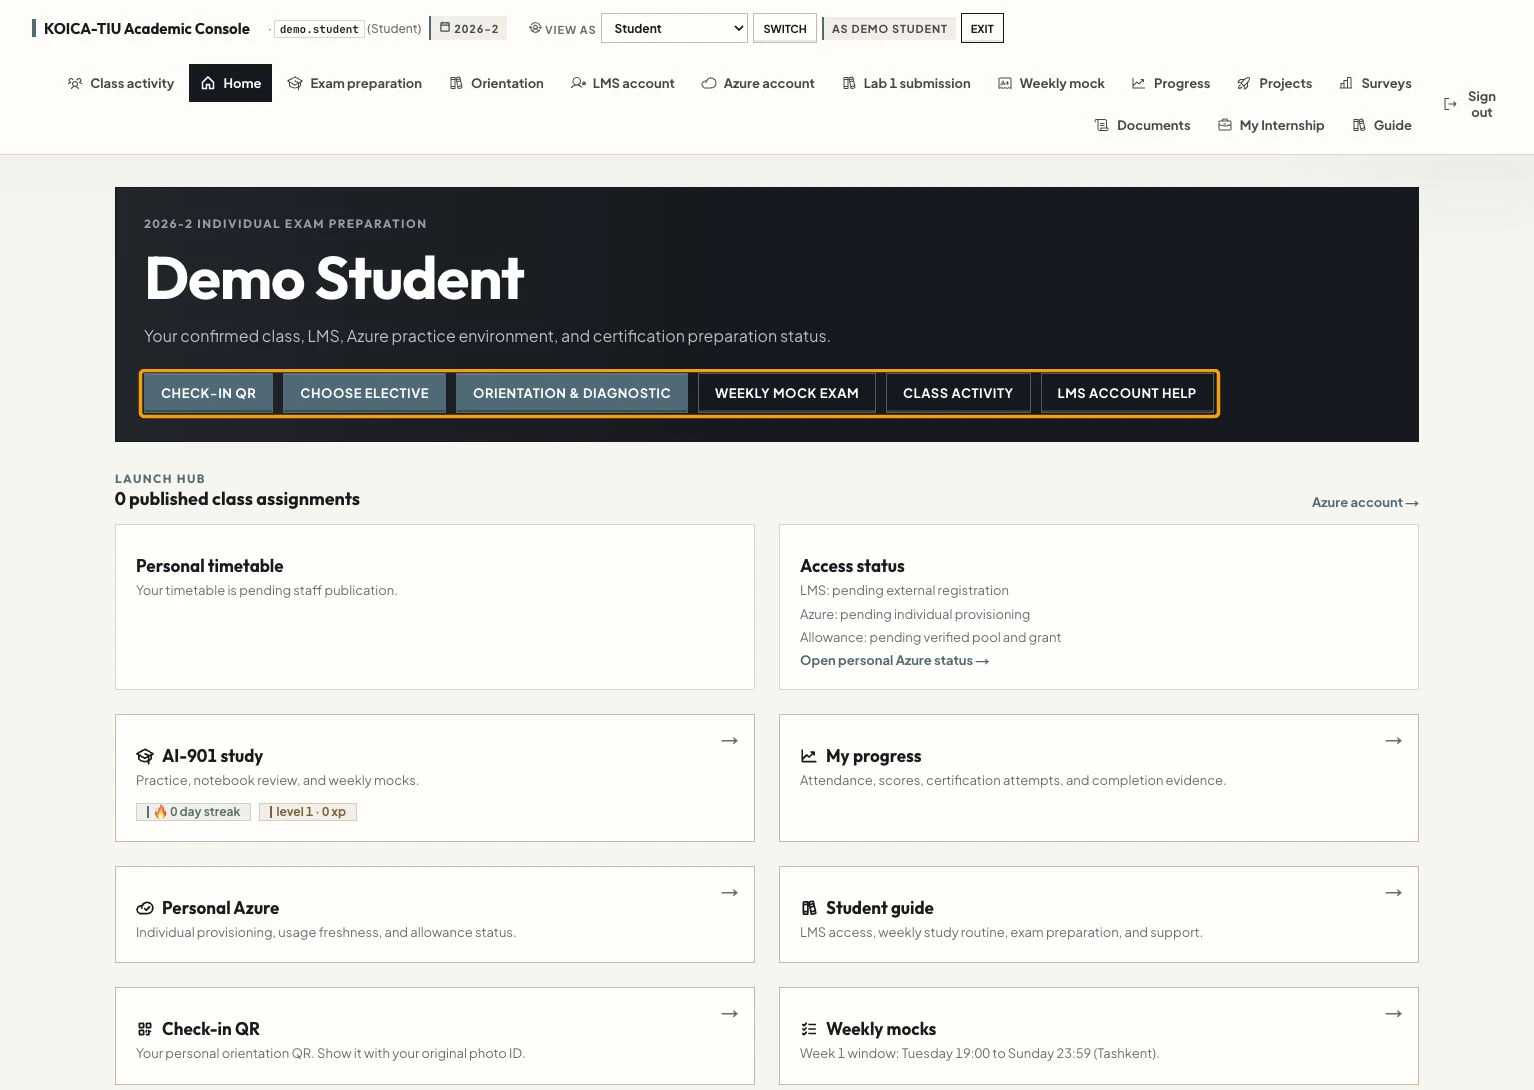
Student demo Home. Its timetable and accounts are pending; the screenshot illustrates the navigation, not a completed student setup. Open full-size image -
Step 03
Find your LMS account help
Do this
- Select LMS account in the top navigation, or LMS ACCOUNT HELP on Home.
- Check your LMS account and delivery status. Use the private login message sent to you for your LMS ID and initial password.
- If you need a password reset, use Request recovery. Include the failed step, but never include your password.
You should see
You have your own LMS login details, or a clear account issue to raise with your tutor.
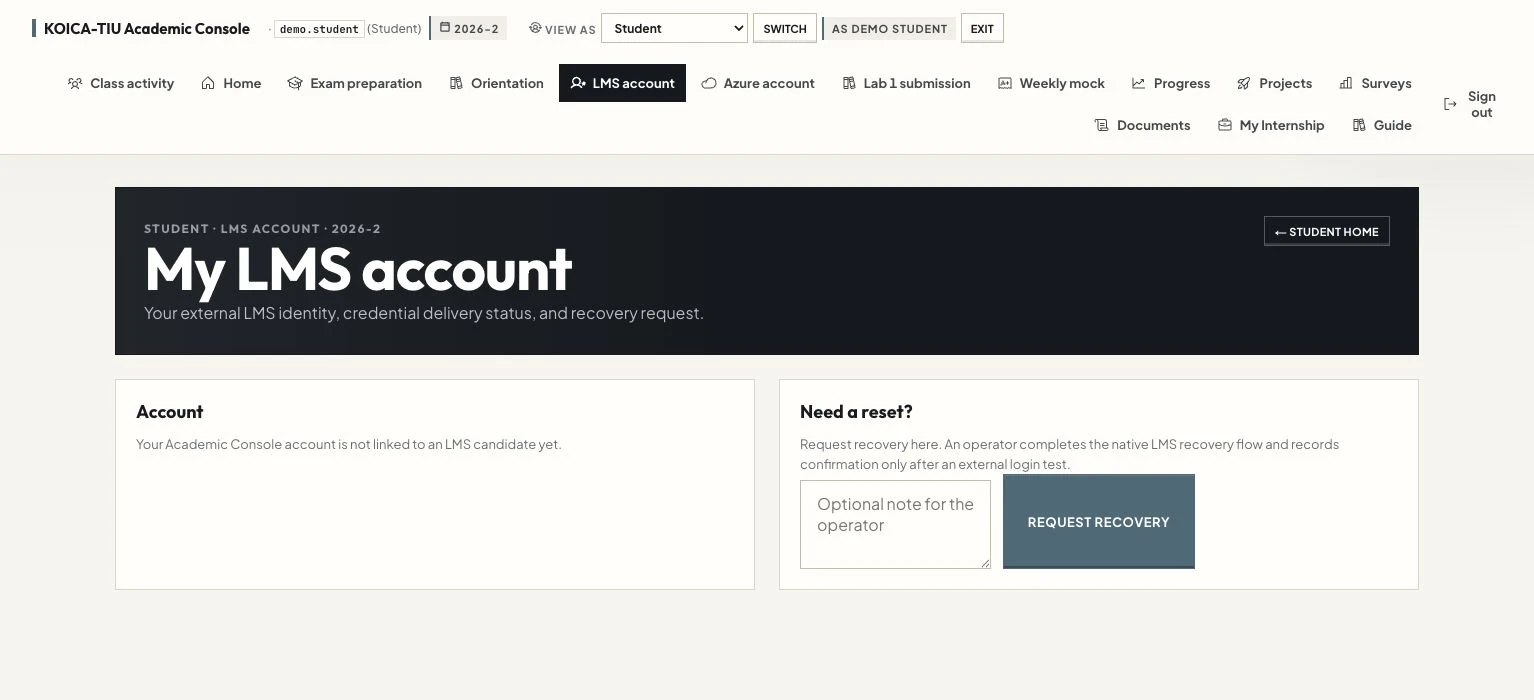
The student demo shows the unlinked-account state and recovery entry. A linked student sees their own account and delivery status. Open full-size image
02
LMS: sign in and open your course
The LMS uses a separate ID and password. Keep the private login message available. The classroom screenshots below use operator access; administrative controls are not part of the student steps.
-
Step 04
Open the LMS login page
Do this
- Open the LMS address in your private message. Check that the host is tiuai-lms.virtualcampus.kr.
- Enter your LMS ID and password in the ID and Password fields, then select Login.
- Use the language menu to select English if needed.
You should see
My Classroom opens after a successful login.
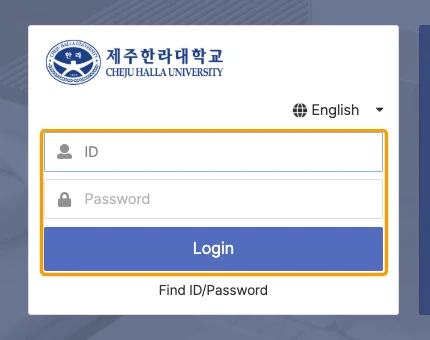
The LMS login screen, captured with empty credential fields. Open full-size image -
Step 05
Open Profile Management from your name
Do this
- In My Classroom, select your name or profile circle at the top right.
- Select Profile Management in that menu.
You should see
A password reauthentication popup opens.
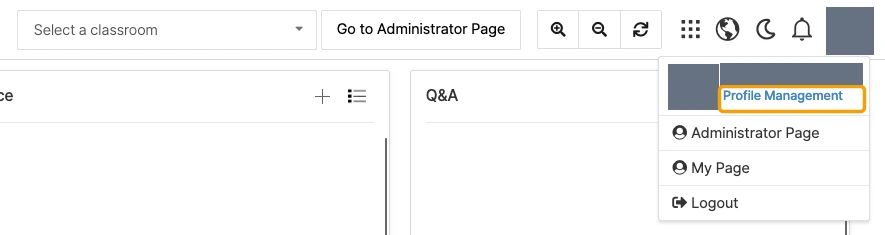
The verified top-right profile menu. Operator identity is masked; the Profile Management entry is shared with students. Open full-size image -
Step 06
Confirm your current password
Do this
- Enter your current LMS password in the reauthentication popup.
- Select OK to open your profile. Keep your password private while sharing your screen.
You should see
Profile Management displays the current, new, and confirmation password fields.
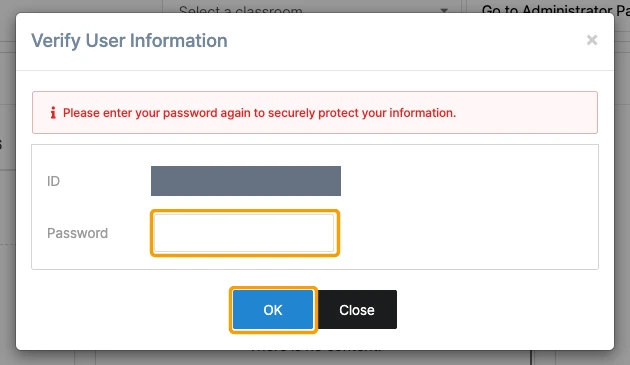
The native reauthentication popup before any password is entered. Open full-size image -
Step 07
Replace your initial password
Do this
- Enter the existing password in Current Password.
- Enter your new password in New Password and Confirm New Password, following the requirements displayed by the LMS.
- Select Save. Keep the new password in your own password manager and use it for your next LMS login.
You should see
The LMS accepts the change. Your replacement password works at your next sign-in.
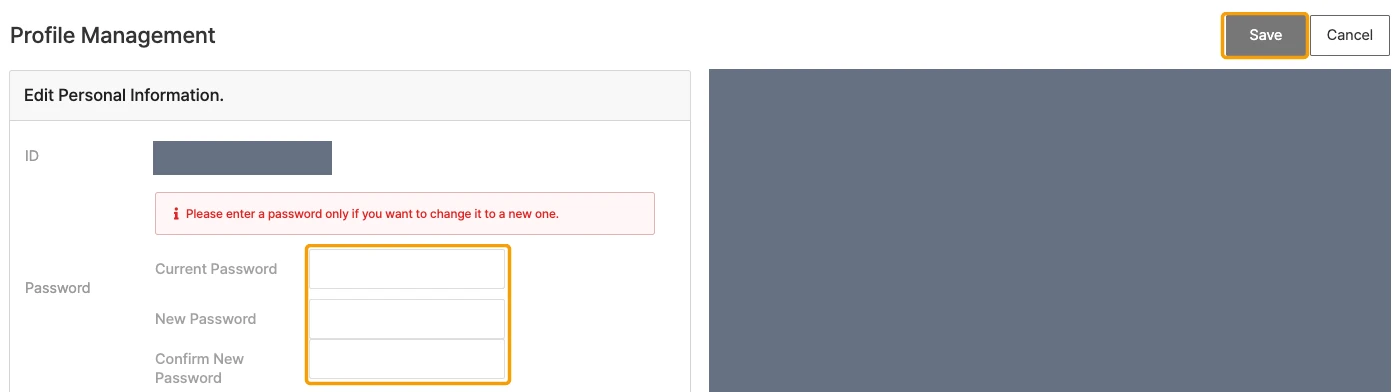
The real password form with empty password fields. Personal profile fields are excluded from the image. No password was changed for this capture. Open full-size image -
Step 08
Open Azure AI Fundamentals (AI-901)
Do this
- Return to My Classroom. Use Select a classroom or your course list to open Azure AI Fundamentals (AI-901) for 2026-2.
- Find List of Lectures. Locate AI-901 Orientation in the lecture list.
- Open the lesson through its title or the learning control offered in your student account.
You should see
Your AI-901 course and the AI-901 Orientation lesson are visible.
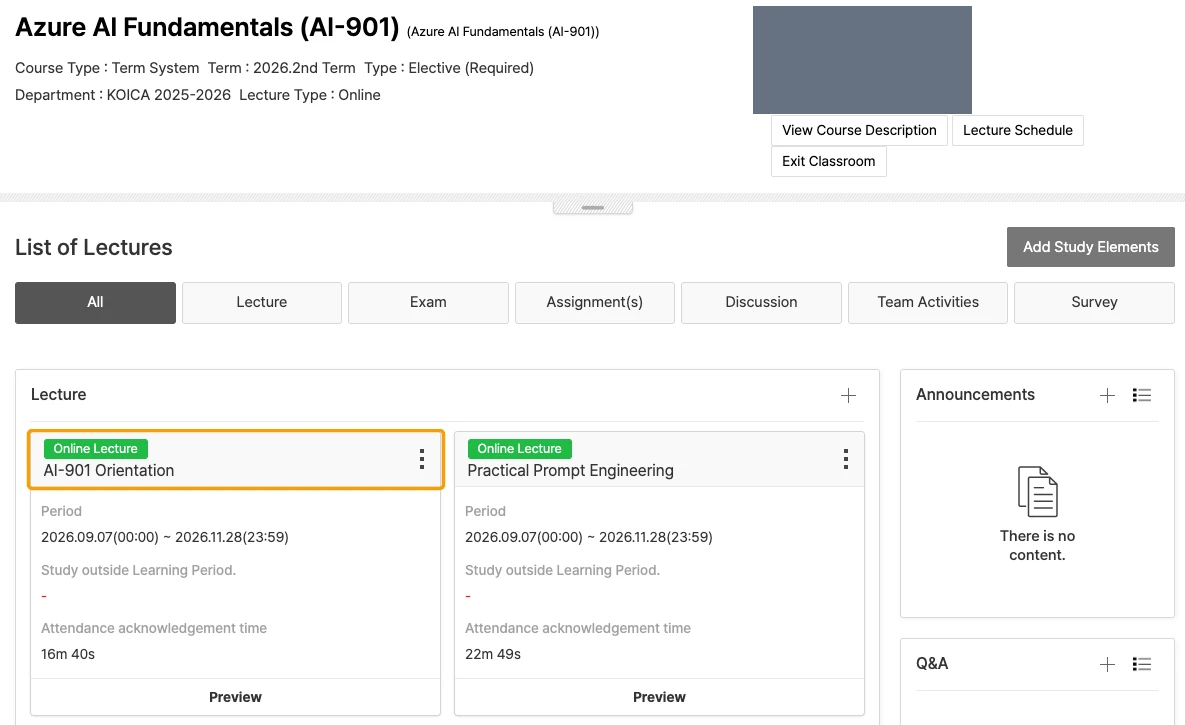
The actual 2026-2 AI-901 lecture list through operator access. Students open their own course; Add Study Elements, Write, and Preview are operator controls. Open full-size image -
Step 09
Check that the lesson opens
Do this
- Check the lesson title and use Play in the video player.
- Use the captions and fullscreen controls when helpful.
- Follow the assigned learning activity in your own student account. Show the course page to your tutor for the first-practice check.
You should see
The lesson player loads and the lesson plays. Opening this guide or an operator preview does not record your student progress.
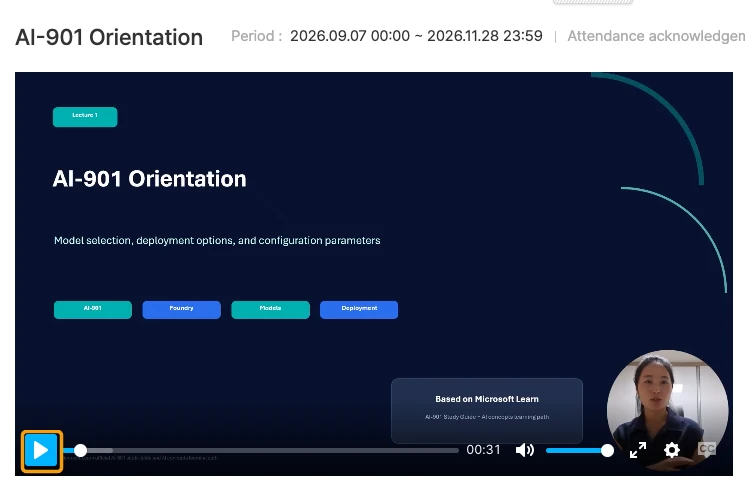
AI-901 Orientation in the native lesson player, opened through operator Preview. Student progress is recorded only in the student's own LMS session. Open full-size image
03
Azure and Foundry: get your first two answers
Use only the Azure account, project, and existing model deployment assigned to you. Allow about 20 minutes for the combined LMS and Azure first-practice check.
-
Step 10
Check My Azure Account in the Console
Do this
- Open Azure account in the Console navigation.
- Read Sign-in and Your Azure environment. Note your assigned account, Project, Deployment, and Resource group privately.
- Use the password delivered to you privately. Check the allowance and its freshness when available.
You should see
Your own account shows an assigned Azure login, project, deployment, and resource group.
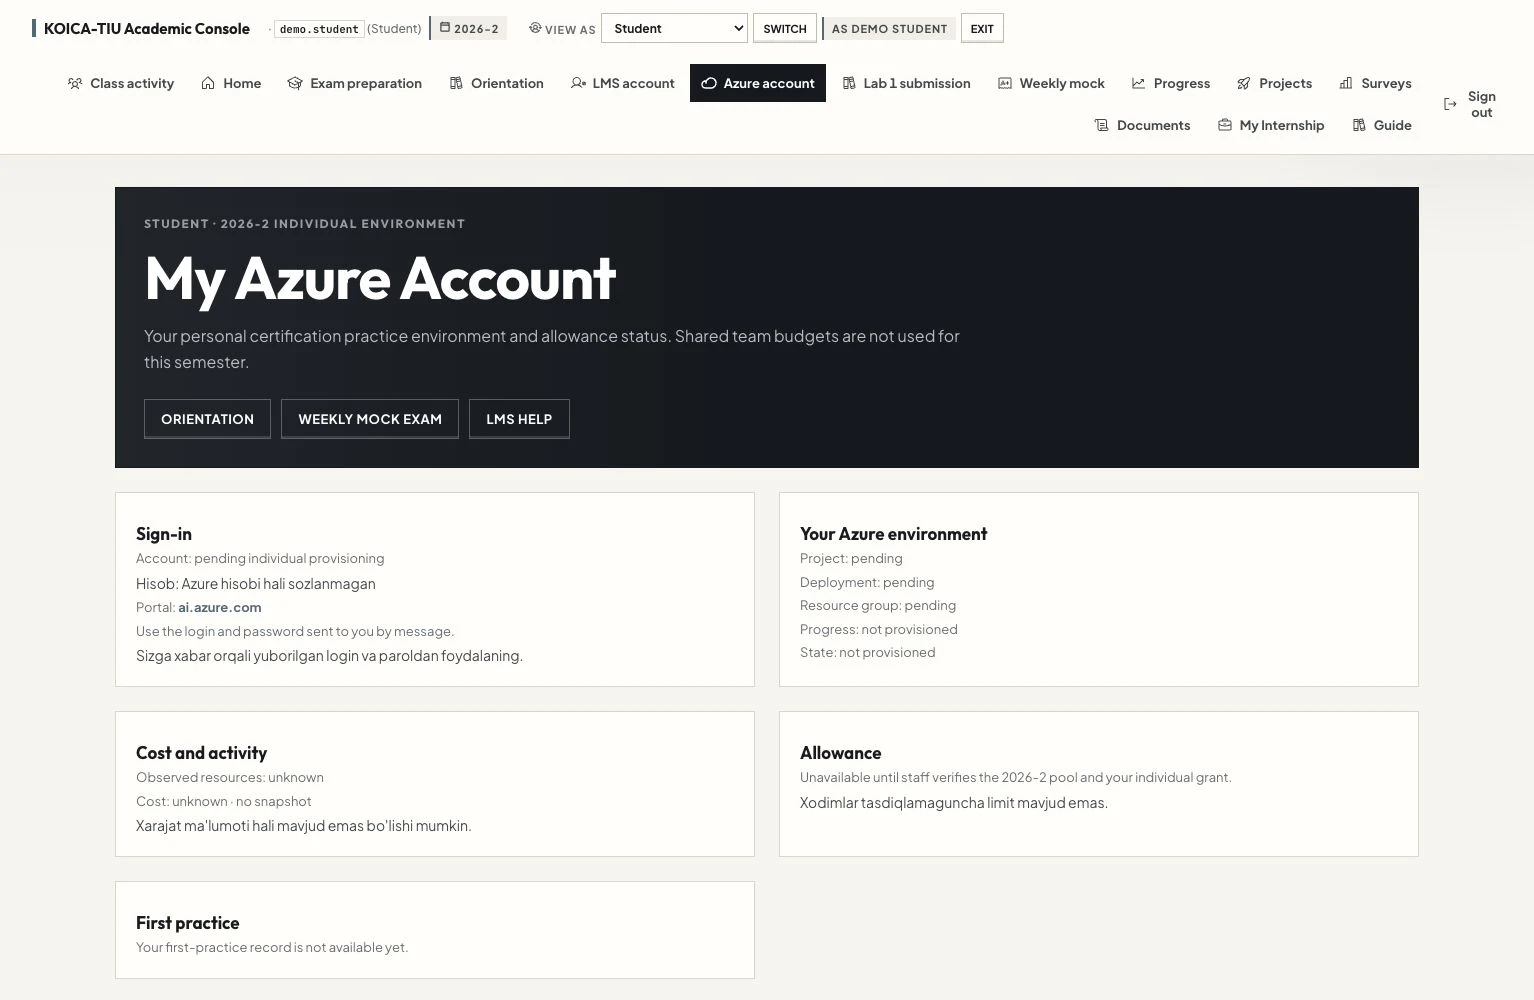
The real student demo account page. Pending and unknown values are genuine demo states, not example credentials or an available allowance. Open full-size image -
Step 11
Sign in with your assigned Azure account
Do this
- Open portal.azure.com and enter the Azure sign-in name shown in your Console, then select Next.
- Enter your assigned password. If Microsoft asks, replace the initial password and complete the required security checks yourself.
- If another Microsoft account is already signed in, choose the assigned KOICA-TIU account or use a separate browser profile.
You should see
Azure opens under your assigned account and organization.
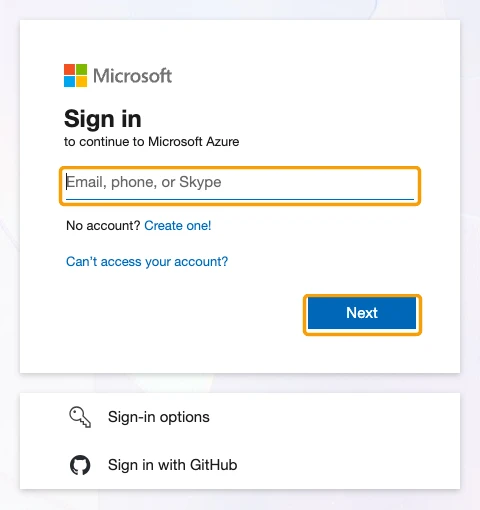
The Microsoft sign-in page before an account name is entered. Password and MFA prompts depend on your account's setup. Open full-size image -
Step 12
Find your assigned resource group
Do this
- In Azure Portal, search for Resource groups or open Resource groups from the navigation.
- Filter the list by the Resource group name shown in your Console.
- Open only that group and check its resources. This is an account/scope check; you do not need to create or change anything.
You should see
The assigned resource group opens with the resources prepared for your practice.
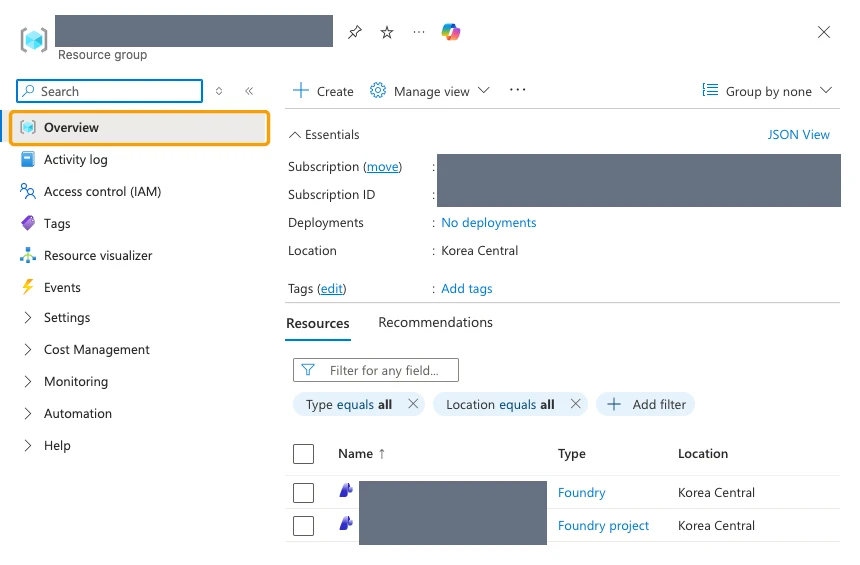
An existing practice resource group opened through operator access. Identifiers are masked; your group name must come from your own Console. Open full-size image -
Step 13
Open your project in Microsoft Foundry
Do this
- Open ai.azure.com using the same assigned Azure account.
- These screenshots use the classic Foundry interface. If New Foundry is on, turn it off and select Continue without feedback if asked. Dismiss an optional new-experience invitation with Cancel.
- Choose the existing project whose name matches Project in your Console.
- Check the selected project in the top bar, then select Playgrounds in the left navigation.
You should see
Foundry opens the assigned project. No new project or resource is required.
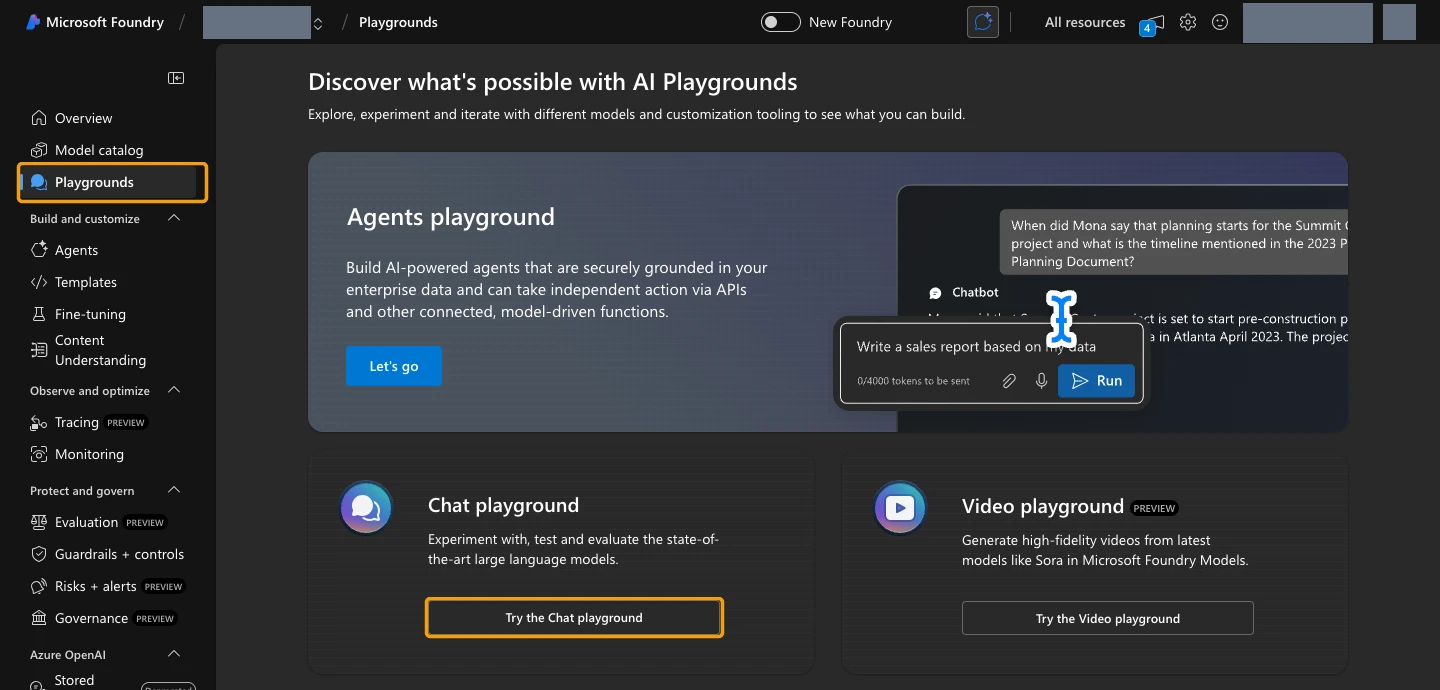
Playgrounds in an existing tutor practice project, with New Foundry switched off. Project, account, and resource identifiers are masked. Open full-size image -
Step 14
Select the existing deployment in the chat playground
Do this
- Under Chat playground, select Try the Chat playground.
- In Setup, use the Deployment selector to choose the existing model deployment named in your Console.
- Leave the practice configuration as provided. You do not need an API key, a new model deployment, or a payment method.
You should see
The selected deployment is ready and the chat input is available.
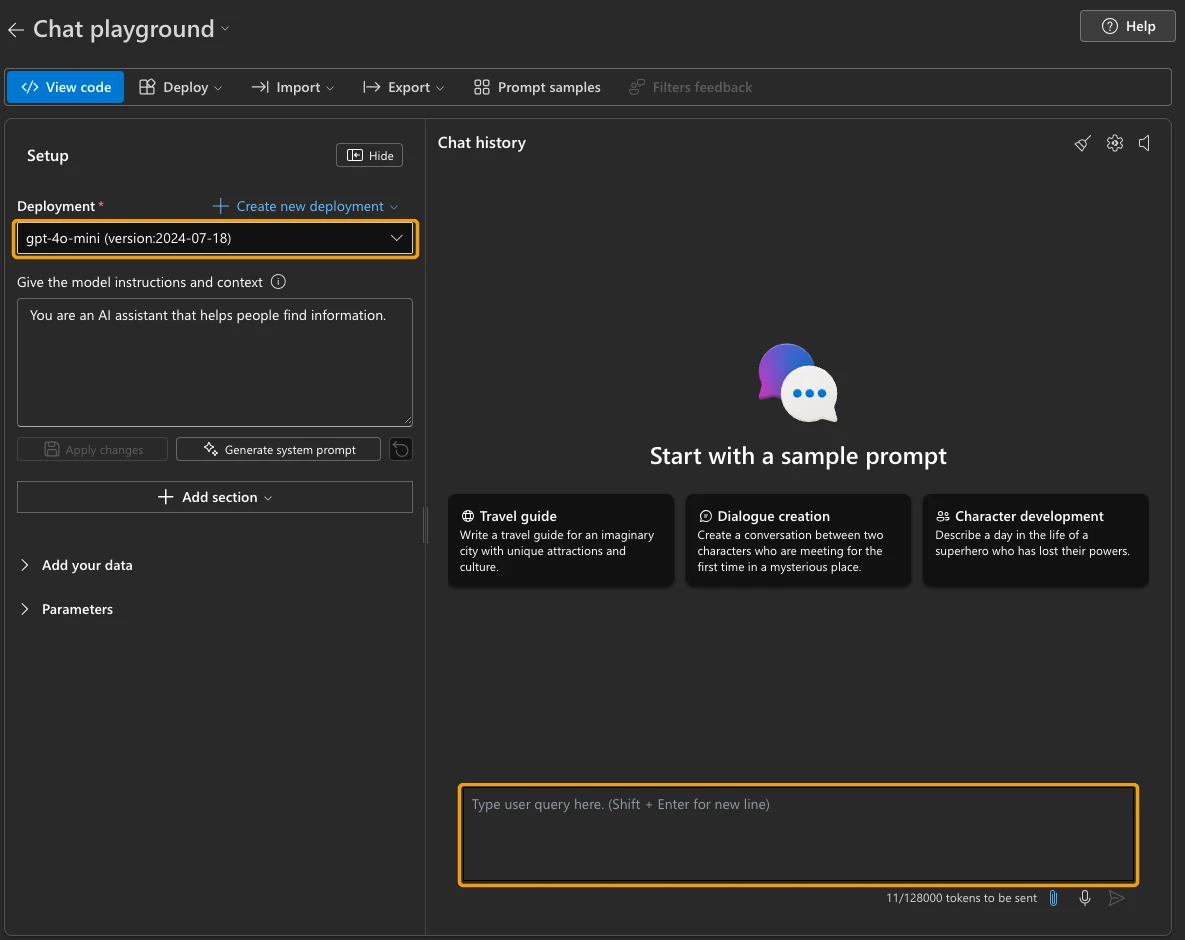
The live Foundry chat playground before the first-practice prompts. Use your assigned deployment, not a name copied from this image. Open full-size image -
Step 15
Ask two short questions and show your tutor
Do this
- Send: Explain artificial intelligence in two simple sentences.
- Then send: Give one example of AI used in education.
- Show both answers and the selected project to your tutor. Stop after the two answers.
You should see
You see two model responses. Your tutor can verify LMS access, Azure login, project access, and both responses.
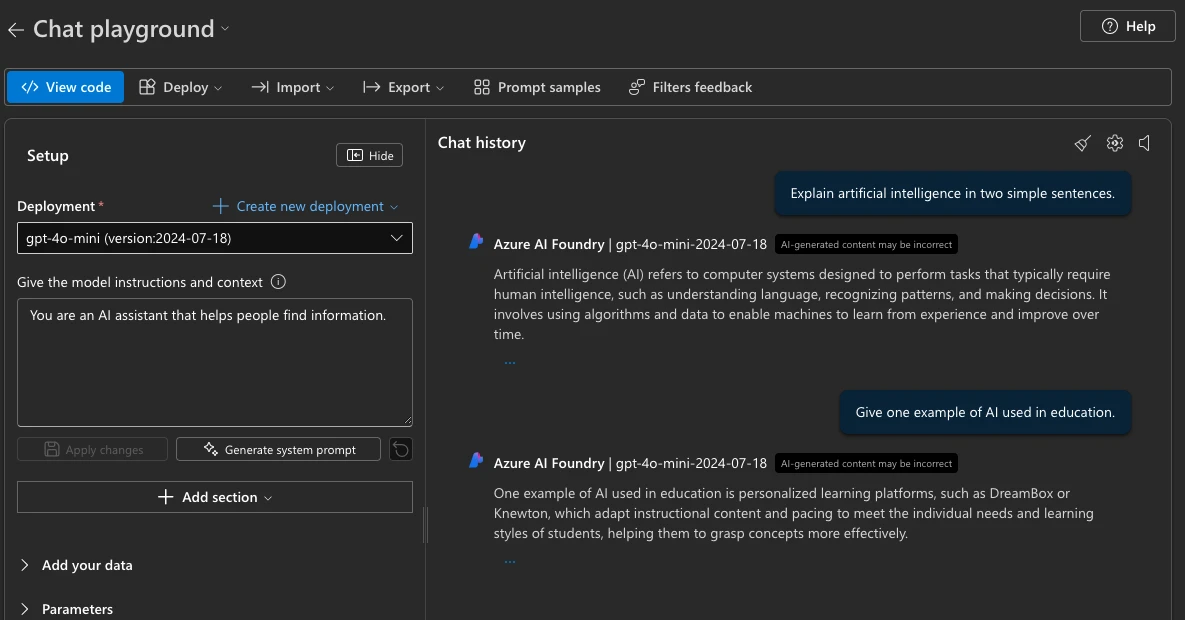
The two prompts executed in the existing practice environment. Model wording may differ; the checkpoint is receiving both answers. Open full-size image
Open the services
Use the confirmed entry points.
Finish here
Your first-practice checklist
- 01LMS opens AI-901
You can reach the AI-901 course from your personal LMS account.
- 02Azure has your assigned project and deployment
Your assigned practice resources are visible in the Azure path.
- 03Your two short responses are shown to your tutor
Your tutor can confirm the practice responses and account path.